 GBP
GBP

Now, before we start – let’s iron out some of the nightmares often faced when making cake pops. Did yours fall off the sticks? Did they look all rough and bitty?
 The smoother your cake pops are when un-coated, the smoother they are when coated and dunked in icing. However of this beginners’ recipe, the ghost coverings, doesn't mean that you have to have a perfect cake pop ball from the start! This is why the ghosts are a great one to start with.
Making cake pops can be time consuming, so we say to tackle this in 3 stages:
1. Baking the cake
2. Rolling the balls
3. Dipping the pops
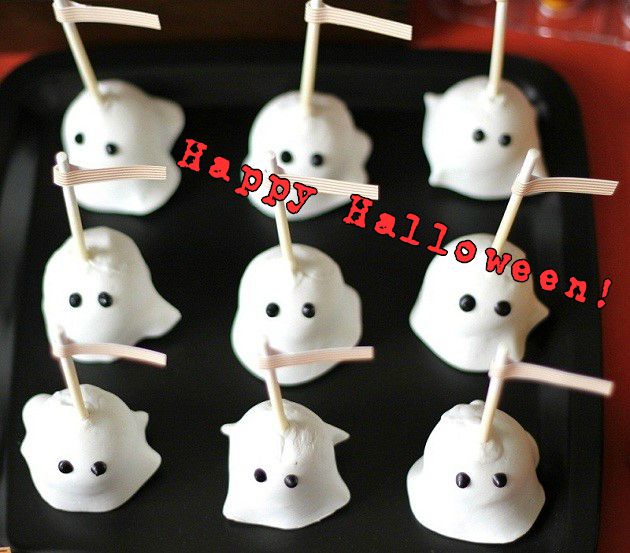
The cake pops we are making today are not in-fact dipped, but coated in a sugar paste covering to represent a scary ghost! This is easier for your first attempt at making the pops.
The smoother your cake pops are when un-coated, the smoother they are when coated and dunked in icing. However of this beginners’ recipe, the ghost coverings, doesn't mean that you have to have a perfect cake pop ball from the start! This is why the ghosts are a great one to start with.
Making cake pops can be time consuming, so we say to tackle this in 3 stages:
1. Baking the cake
2. Rolling the balls
3. Dipping the pops
The cake pops we are making today are not in-fact dipped, but coated in a sugar paste covering to represent a scary ghost! This is easier for your first attempt at making the pops.
 Bake a cake. We used a 9" rectangle tin. Our size tin will make approximately 30 cake pops. You can always bake the cake and divide into sections, then freeze for the next time you want to make cake pops.
Once your cake is baked, allow it to cool. Score it into four equal parts with a knife. Note the quantity that your own favourite recipe yields the first time you make them. This will help you plan in the future. One quarter of our cake will make 7/8 cake pops.
Bake a cake. We used a 9" rectangle tin. Our size tin will make approximately 30 cake pops. You can always bake the cake and divide into sections, then freeze for the next time you want to make cake pops.
Once your cake is baked, allow it to cool. Score it into four equal parts with a knife. Note the quantity that your own favourite recipe yields the first time you make them. This will help you plan in the future. One quarter of our cake will make 7/8 cake pops.
 Cut out squares of white icing and large enough to cover your cake pops. Simply drape your icing square over your pop with your fingers, don't pinch too hard though! The ghosts will then look nearly complete.
The smoother your cake pops are when un-coated, the smoother they are when coated and dunked in icing. However of this beginners’ recipe, the ghost coverings, doesn't mean that you have to have a perfect cake pop ball from the start! This is why the ghosts are a great one to start with.
Making cake pops can be time consuming, so we say to tackle this in 3 stages:
1. Baking the cake
2. Rolling the balls
3. Dipping the pops
The cake pops we are making today are not in-fact dipped, but coated in a sugar paste covering to represent a scary ghost! This is easier for your first attempt at making the pops.
Ingredients for spooky cake pops:
½ cup butter ¾ cup sugar 2 eggs ¾ cup flour ¼ tsp salt 24 lollipop sticks FrostingStep 1:
Bake a cake. We used a 9" rectangle tin. Our size tin will make approximately 30 cake pops. You can always bake the cake and divide into sections, then freeze for the next time you want to make cake pops.
Once your cake is baked, allow it to cool. Score it into four equal parts with a knife. Note the quantity that your own favourite recipe yields the first time you make them. This will help you plan in the future. One quarter of our cake will make 7/8 cake pops.
Step 2:
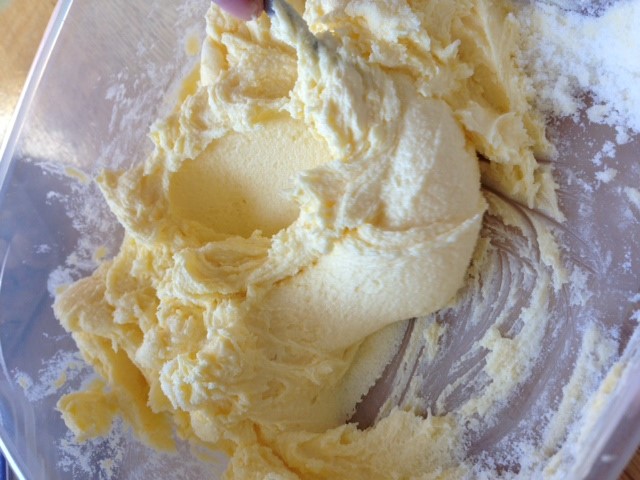
Crumble trimmed cake into a large bowl. We make sure that the cake is trimmed down well, so don't include the bottom of the cake if it’s slightly stuck or the edges. Keep the nice bouncy sponge in the bowl and nibble on the left overs in the tin. They won't make great balls! Add frosting and mix thoroughly with hands. Add the frosting a bit at a time, don't just dump the whole tub in at once. Once added and mixed, you should have a thick, squiggly cake dough and this is then easy to form into balls.Step 3:
Chill mixture approximately 2 hours in the fridge. If you are inpatient like us - they you can put in the freezer for a fraction of the time.Step 4:
Measure cake mixture and roll into 1” sized balls. Place on a wax paper lined baking sheet. You may need to place the cake balls back in the fridge for 20-30 minutes, allowing them to firm up. We like to use a butter ball scoop - but make sure its small as large heavy cake pops are not attractive - plus, they will grow when they are dunked or covered remember.Step 5:
Insert a lollipop stick into each cake pop. You can dip the lollipop stick into a small amount of white candy coating before inserting into the cake pop if you have previously had issues with your pop falling off the stick. Remove a few cake pops at a time to cover, storing the others in the fridge until ready.Step 6:
Cut out squares of white icing and large enough to cover your cake pops. Simply drape your icing square over your pop with your fingers, don't pinch too hard though! The ghosts will then look nearly complete.